
Sound barrier sheets are an excellent solution for reducing noise pollution in various environments, from residential areas to industrial sites. These sheets, typically made from materials like mass-loaded vinyl (MLV), acoustic foam, or specialised fibreglass, are designed to block or absorb sound, making spaces quieter and more comfortable. However, to achieve maximum effectiveness, proper installation is crucial.
Here’s a step-by-step guide on how to install sound barrier sheets for the best results.
1. Assess the Area
Before you begin installation, it’s important to thoroughly assess the area where the sound barrier sheets will be applied. This includes identifying the primary sources of noise, the surfaces that need to be treated, and any obstacles or structural elements that may affect installation.
Key Considerations:
- Noise Source: Determine where the noise is coming from and the level of noise reduction required. This will help you choose the right type of sound barrier sheet.
- Surface Type: Check the surfaces where the sheets will be installed (walls, ceilings, floors, or fences) to ensure they are suitable for adhesive or mechanical attachment.
- Obstructions: Identify any doors, windows, electrical outlets, or fixtures that may need to be accommodated or worked around during installation.
2. Choose the Right Sound Barrier Sheet
Selecting the appropriate sound barrier sheet is critical for effective noise reduction. Different materials offer varying levels of soundproofing, so choose the one that best meets your needs.
Options Include:
- Mass-Loaded Vinyl (MLV): Ideal for blocking airborne noise, MLV is a dense, flexible material that can be easily applied to walls, ceilings, and floors.
- Acoustic Foam: Used primarily for absorbing sound, acoustic foam is suitable for controlling echo and reducing reverberation within a room.
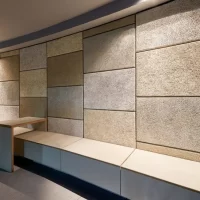
- Fibreglass Sheets: These are effective for both blocking and absorbing sound, making them versatile for various applications, including industrial environments.
3. Prepare the Surface
Proper surface preparation is essential for ensuring that the sound barrier sheets adhere correctly and perform optimally.
Steps:
- Clean the Surface: Make sure the surface is clean, dry, and free of dust, debris, or grease. Use a damp cloth or a mild cleaner if necessary.
- Repair Any Damage: Fill in any cracks, holes, or imperfections in the surface with filler or putty, and sand smooth once dry. A smooth, even surface ensures better adhesion.
- Measure and Mark: Measure the area carefully and mark where the sheets will be placed. This will help you align the sheets properly during installation.
4. Cut the Sheets to Size
Sound barrier sheets often come in standard sizes that may need to be trimmed to fit your specific space. Precision cutting ensures a snug fit and maximum effectiveness.
Tips:
- Use Sharp Tools: Use a utility knife or heavy-duty scissors for cutting sound barrier sheets. Ensure your tools are sharp to avoid fraying or jagged edges.
- Measure Twice, Cut Once: Double-check your measurements before cutting to avoid mistakes. It’s better to cut slightly larger and trim down as needed.
- Account for Overlaps: If multiple sheets are required, plan for a slight overlap at the edges to prevent sound leaks.
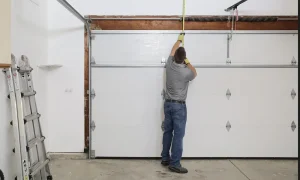
5. Install the Sheets
The installation method will depend on the type of sound barrier sheet and the surface it’s being applied to. There are generally two main methods: adhesive attachment and mechanical fastening.
Adhesive Attachment:
- Apply Adhesive: For sheets that come with an adhesive backing, peel off the protective layer and press the sheet firmly onto the surface. For non-adhesive sheets, use a suitable construction adhesive or spray adhesive.
- Press and Smooth: Start from one corner and press the sheet onto the surface, smoothing out any air bubbles or wrinkles as you go. Use a roller to ensure full contact with the surface.
Mechanical Fastening:
- Use Screws or Nails: For heavier sheets like MLV, use screws, nails, or staples to secure the sheet to the surface. Place fasteners at regular intervals around the edges and in the centre for added stability.
- Install in Sections: If covering a large area, work in sections, ensuring each sheet is securely fastened before moving on to the next.
6. Seal the Edges and Joints
For maximum noise reduction, it’s essential to seal all edges and joints where sound could potentially leak through.
Steps:
- Use Acoustic Sealant: Apply a bead of acoustic sealant along the edges of the sheets, particularly where they meet the floor, ceiling, or adjacent walls.
- Tape the Seams: For additional soundproofing, use acoustically-rated tape to cover seams between sheets. This will prevent sound from escaping through any gaps.
7. Test and Adjust
After installation, it’s important to test the effectiveness of the sound barrier sheets and make any necessary adjustments.
Testing:
- Conduct a Sound Check: Play music or use a sound meter to assess the noise levels before and after installation. Listen for any areas where noise is still penetrating.
- Make Adjustments: If necessary, apply additional layers of sound barrier sheets or seal any gaps that may have been missed during the initial installation.
8. Finish and Clean Up
Once the sheets are installed and tested, finish up by tidying the area and making any final adjustments.
Final Steps:
- Trim Excess Material: If any sheets extend beyond the desired area, carefully trim the excess with a utility knife.
- Clean Up: Remove any tools, debris, or leftover materials from the area. If adhesive was used, wipe away any excess before it dries.
Conclusion
Installing sound barrier sheets effectively requires careful planning, precise execution, and attention to detail. Choosing the right materials, preparing the surface properly, and following best practices for installation, you can significantly reduce noise levels in your space. If you’re aiming to block external noise from entering a room or containing sound within a specific area, sound barrier sheets are a versatile and effective solution when installed correctly.